The importance of bathroom interior design parallels the rest of the interiors in the home. Therefore, bathroom decor renovations should also match the design trends. And, the best way to reinvigorate the bathroom design is to start with wall upgrades. Incorporating panels into the bathroom design is a delightful and desirable bathroom interior upgrade.
Besides, panels are a trendy wall decor option that makes the wall look stylish and also perfectly replaces wall paint and tiles. Adding further, bathroom wall paneling offers the efficacy of installation and therefore, is increasingly becoming popular. To get the best out of wall wooden panels in the long run, you need to precisely install them.
And if you’re looking for a step-by-step guide to fit the bathroom panels, you’re absolutely in the right place. In this article by Wallpaper Land, we’re going to give a comprehensive explanation to let you DIY complete your bathroom panel installation project.
An All-Inclusive Explanation For A Precise & DIY Fitting Of Bathroom Wall Panels
Panels installed in the bathrooms comprise acrylic stone resin or moisture-resistant MDF and therefore, prove to be extremely durable and water-resistant. Speaking of the benefits, you’ll enjoy a range of amazing features with the installation of these panels in the bathroom interior.
Not only do these panels require minimal maintenance practices but also are available in a wide variety of styles and finishes. Coming toward the installation, you don’t need to be a tiling expert for this DIY task completion.
Why Are Panels Better Than Bathroom Wall Tiling?
In comparison to tiles, panels are super affordable, easy to install, and can be efficiently replaced in case of damage. On the other hand, you’ll have to spend more money for purchasing tiles as well as it requires more effort and expertise to fit tiles.
As for replacement, tiles are fragile and get broken easily thus, tile replacement is commonly practiced. No need to mention that even the wall wooden panels compete with tiles in terms of durability.
Can Bathroom Wall Panels Be Installed Over Tiles?
Yes, bathroom wall paneling can be done over existing tiles and there’s no need to remove the bathroom tiles. However, you need to measure the area of the tiles accurately prior to installing panels over them. It will ensure that the paneling is done seamlessly and doesn’t allow mold and fungus growth just as in the case of the bathroom tile joints due to condensation.
The Procedure To DIY Fit Your Bathroom Wall Luxury Panels
The selection of panels for the bathroom walls should be ideally followed by a top-quality DIY installation process to reap all the benefits of this valuable investment. Follow the guidelines explained below to fit these panels DIY without paying additional service charges to the professionals.
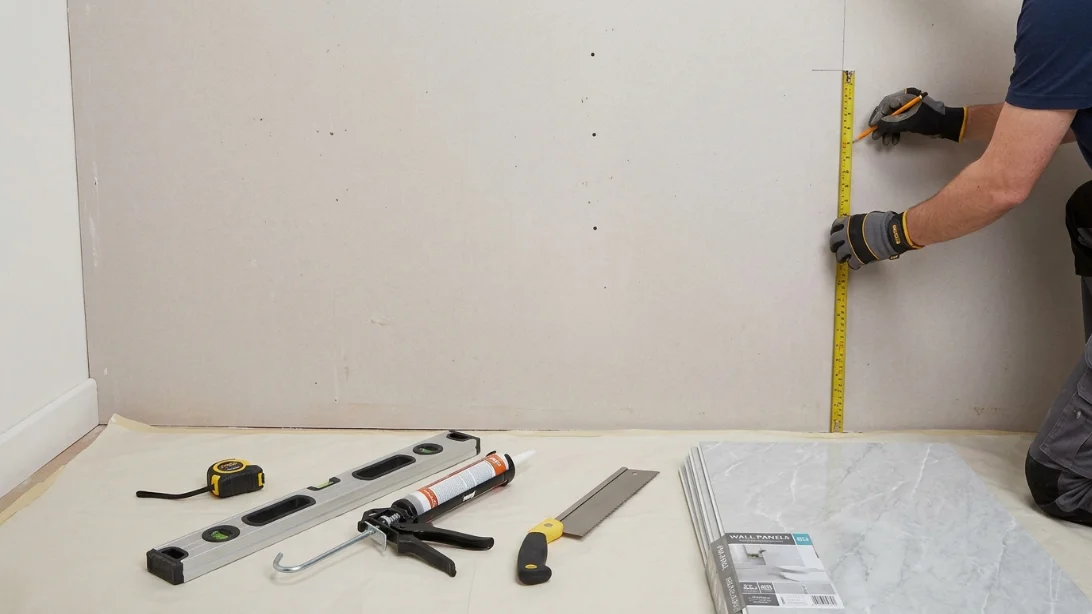
Take Area Measurements
You’ll have to take measurements of the total wall area to be covered with panels. In case, the wall surface is flat with no bumps or hurdles, the wall panel installation will become quite easier and less arduous.
However, corners and obstacles can be ideally dealt with by making marks and cutting the panels for precise installations. As far as measurements are concerned, you need to take repeated measurements for accuracy purposes.
Clean The Panels Prior To Fitting
Prior to installation, you need to properly and thoroughly clean the bathroom wall panels using an anti-bacterial solution. In this concern, you need to lay the panels flat for added efficacy to the process.
Tools/Materials Needed
The right set of tools and materials can boost the process efficacy alongside the proper and precise fitting of the bathroom wall panel installation. Below, we’ve described the most essential tools and equipment needed for the job.
- Caulking Gun
- Safety Goggles
- Tape Measure
- Sharp Blade
- Electric or Automated Tooth Saw
- Sealant Adhesive
- Sand Paper
- Sealing Kit
When all these equipment and material demands are met, you can proceed with the DIY bathroom wall paneling as explained.
1. Draw Markings & Cut Accordingly
The first and foremost step to be taken is to draw markings and cut the marked lines on the surface of the panels. For markings, you have to lay the panels flat on a surface. Use a pencil and ruler to draw markings in a straight line on the panel surface.
Always cross-check the marking line placement prior to cutting the panel correspondingly. Now, you have to cut the wall wooden panels using an electric saw or a fine tooth saw depending upon what can be made available.
2. Smoothen The Wall Panels
Now comes the time to apply the sandpaper for smoothening the rough wall panel edges. Not to say that you’ll get a smooth, sleek finish for the wall panel besides getting rid of the surface debris, grime, and dirt. Also, the process of sanding allows the sealant to adhere strongly to the wall paneling.
3. Position The Trim In Place
The next thing is to attach the trim so that the panels can easily slot into position for installation. For positioning the trim, you need to apply an adhesive sealant to the wall panel and surface. To deal with around-the-corner scenarios, you can apply a sealant to panels for better traction or adhesion.
4. Install The Panels On The Bathroom Walls
The time has come for bathroom wall paneling. Now, you need to secure wall panels in place. To complete the process efficiently, follow the guidelines below.
First, we need to apply the panel adhesive as explained. Additionally, you should start paneling the bathroom wall from one corner to the other.
- Apply the thin line of sealant adhesive on both sides of the wall panel.
- In the middle, apply the adhesive again in a zig-zag fashion for better traction against the wall.
- Now, apply adhesive in large circles all over the panel.
- Next, you have to remove the back of the foam tape and slot the panel into position.
- Don’t allow the foam tape to stick to the wall until you’ve positioned the panel against the wall correctly.
- With one wall panel in position accurately, you can repeat the procedure for installing all the panels.
- Don’t forget to use the tongue and groove joint method for connecting the consecutive panels.
- Also, make sure that there is no seam left behind after installing each wall panel.
5. Finalize The Job
Once, all the panels are in place, you need to make use of the sealant kit for fixing them in place permanently. Most commonly when you push the panels after applying sealant, they’ll settle into place against the wall with a clicking sound. However, it’s not a big deal if that doesn’t happen in your case.
Conclusion!
The DIY fitting of bathroom wall panels may have been a challenging task but not anymore. Because in this article, we’ve explained the procedure in simple, understandable steps to let you perform this task efficiently and precisely. Now, you should spare some of your precious time, arrange for the given supplies/equipment, and follow the guidelines for this DIY task completion.